DPSF provides templates for creating new particle systems to help make the process as easy as possible. The templates have TODO sections giving instructions on what should be modified in the file and where to put your particle system's custom code.
The templates for creating particle systems, both that inherit from the the default particle systems and that do not, are found in the Templates folder included with DPSF. The templates whose names start with Default inherit from the default particle system classes and have some predefined functionality, and may be used to create new particle systems from the default classes. The templates whose names do not start with Default do not have any predefined functionality (except what is shown in the template file as an example) and may be used to create new particle systems from scratch.
Creating a new particle system file and getting it into your project
Step 0 - If you haven't added the DPSF.dll to your project's references yet, do that first.
Step 1 - Choose which type of particle system you want to create and locate its corresponding default template file. The Templates folder can be found at Windows Start Menu -> All Programs -> DPSF -> Templates (or at C:\DPSF\Templates). If you are creating a particle system that inherits from the default particle system classes, the template file will be named DefaultXParticleSystemTemplate.cs, where X is the type of particle system you want to create. The template files that do not start with "Default" do not inherit from the default particle system classes, do not have any predefined functionality, and should be used when creating new particle systems from scratch.
As a side note, the source code for the default particle and particle system classes is also provided as a learning resource and may be modified however you like. The source code file is named DPSFDefaults.cs and can be found in the Templates folder (i.e. C:\DPSF\Templates).
Step 2 - Copy (don't cut) and paste the template file into your project's directory. I recommend placing it and all other particle systems you create in a directory called Particle Systems as shown in the DPSF Demo project, but this is not mandatory; it just helps keep things organized.
Step 3 - Rename the file to match what your particle system class name will be. For example, if you are creating a Fireball particle system class you could call it FireballParticleSystem.cs.
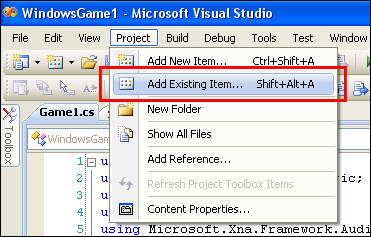
Step 4 - In Visual Studio, add the renamed file to your project. You can do this by selecting the Project menu item and choosing Add Existing Item..., then navigating to the file and choosing it. You will likely want to keep the particle systems organized in your project as well, so you can create a new folder to hold all of the particle systems by selecting the Project menu item and choosing New Folder, then rename to the folder to Particle Systems. You can then drag and drop the particle system files you add to your project into the Particle Systems folder.
Step 5 - Now that we have the file loaded into the project, open the file so we can start editing it. The first thing we want to do is refactor the name of the particle system class from the default template name to match the new name of the file, which you specified in Step 3. To do this right click on the particle system class name and choose Refactor -> Rename.... If you are not using one of the Default particle system templates, you will want to do the same thing for the particle class name and the particle vertex structure name. You want to refactor these class / structure names so that when you create new particle systems later their names won't conflict with one another.
From here you could test out the particle system with its default behavior by following the instructions to Define, Update, and Draw a Particle System.